Prototype tooling is a specialized manufacturing process used to create functional, production-grade plastic parts quickly and at a fraction of the cost of permanent steel molds. You often face the daunting challenge of high upfront investments when bringing a new product to life. Launching without physical validation can lead to expensive design failures and missed market windows. Using a prototype mold allows you to test your design in real-world conditions before committing to expensive high-volume equipment.
Now, you can mitigate these risks by choosing a flexible tooling strategy that prioritizes speed and iterative feedback. This approach ensures your final product is optimized for performance and manufacturability from the very first shot.
What is prototype tooling for injection molding?
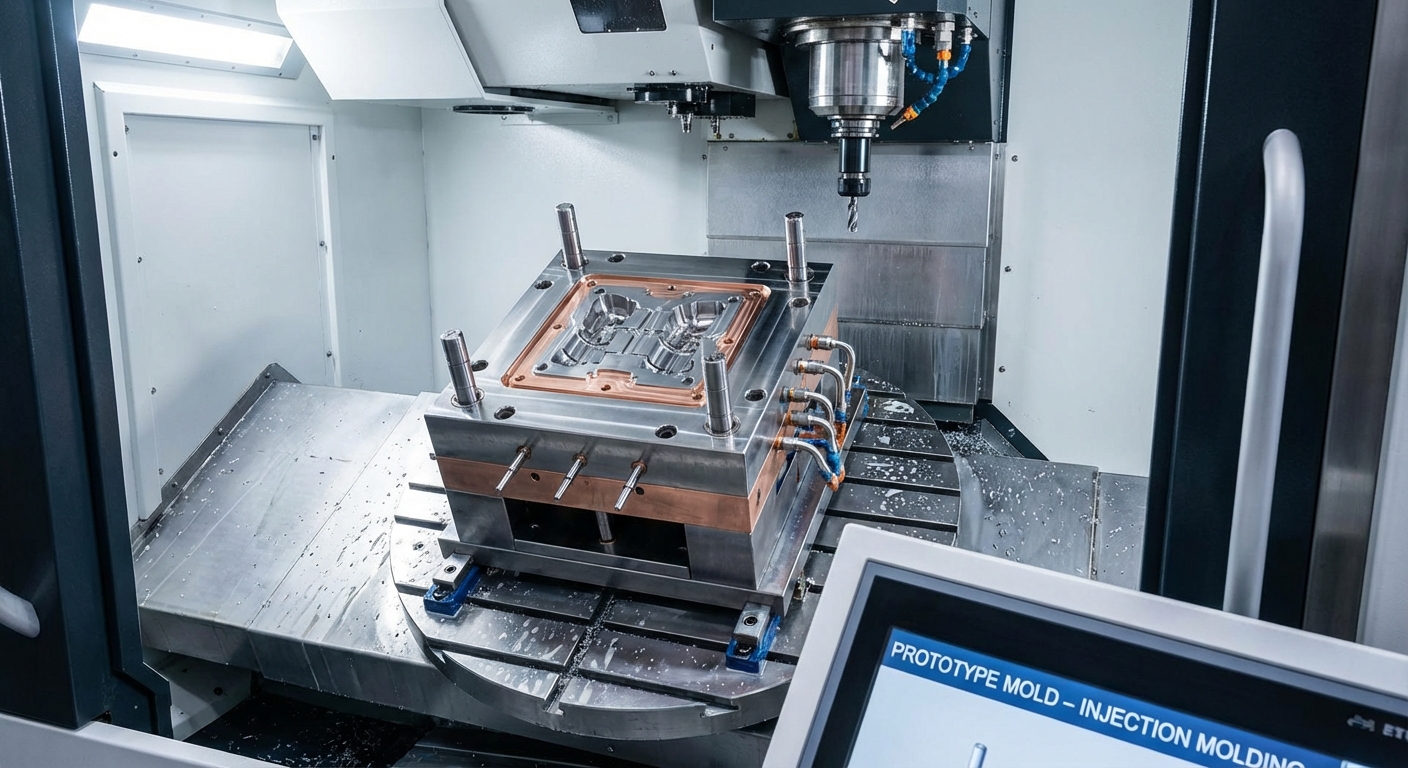
Prototype tooling refers to the creation of temporary or soft-metal molds designed to produce small batches of plastic parts for testing and validation. When you utilize a prototype mold , you are choosing a path that balances speed with material authenticity. These tools are typically machined from aluminum or P20 steel to ensure faster turnaround times than traditional hardened steel.
Why does speed matter for your project?
Here is the deal: modern markets do not wait for slow development cycles. You need to move from CAD to physical parts in days rather than months.
- Rapid aluminum machining reduces lead times significantly.
- Simplified mold designs eliminate complex cooling channels for faster builds.
- Direct-to-tooling workflows bypass traditional manufacturing bottlenecks.
Key Takeaway: You can achieve significant market advantages by utilizing rapid tooling to validate your concepts and iterate designs within a single business week.
| Feature | Prototype Tooling | Production Tooling | |
|---|---|---|---|
| Material | Aluminum / Soft Steel | Hardened Steel | |
| Lead Time | 5 to 15 Days | 4 to 10 Weeks | |
| Durability | 2,000+ Cycles | 100,000+ Cycles |
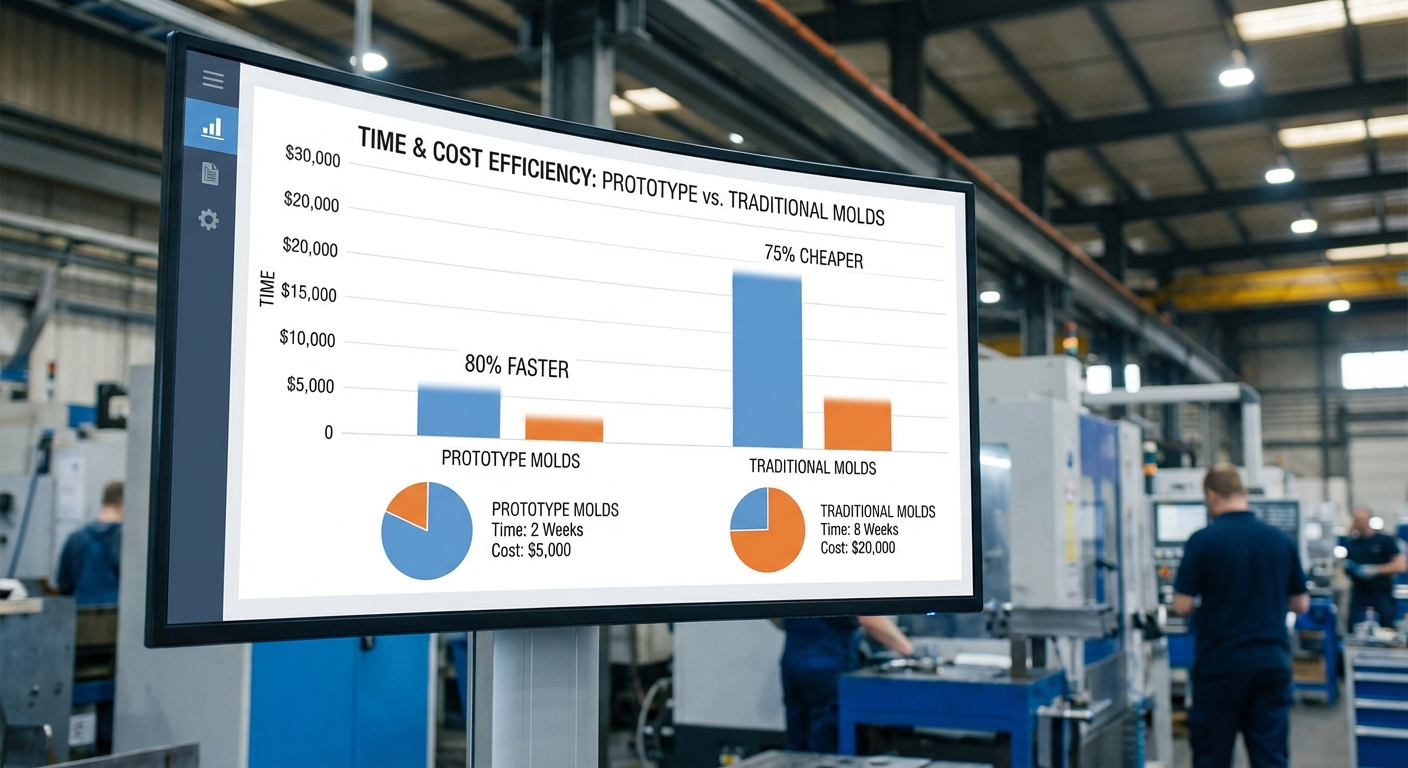
Analysis of the data shows that prototype tools provide an 80% reduction in lead time compared to traditional steel molds.
Why should you choose a prototype mold for development?
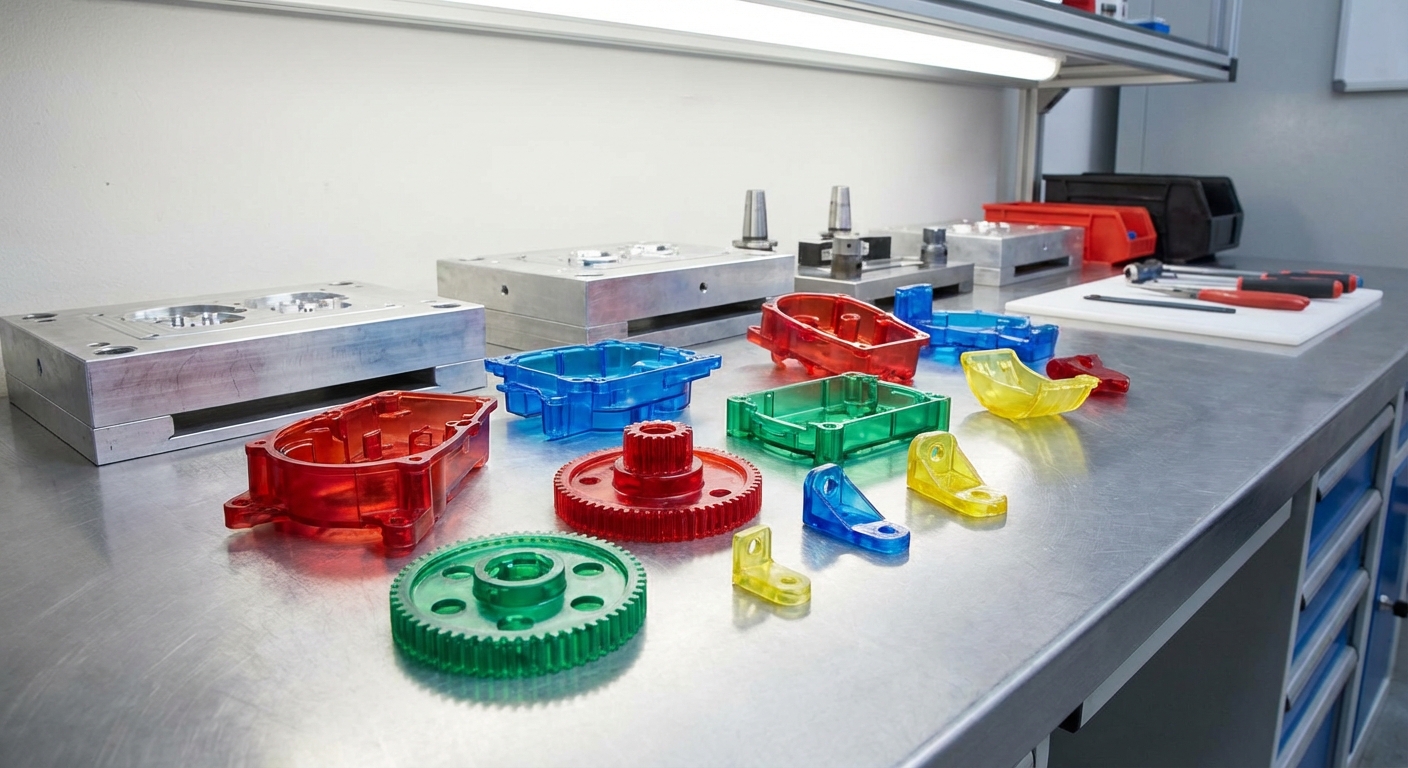
You should choose a prototype mold because it allows you to test parts in their final production resin under actual operating conditions. This method provides a level of certainty that 3D printing or CNC machining alone cannot match. A prototype mold gives you the ability to verify fit, finish, and mechanical strength before scaling up.
Is functional testing truly necessary?
But wait, there is more to it than just seeing the part. You need to know if the part will survive the stresses of its intended environment.
- Test mechanical properties like tensile strength and heat resistance.
- Verify chemical compatibility with specific industrial resins.
- Conduct drop tests and structural integrity assessments.
Key Takeaway: Investing in early-stage molding allows you to catch critical failures before they become multimillion-dollar production mistakes.
| Testing Goal | Prototype Mold | 3D Printing | |
|---|---|---|---|
| Material Accuracy | 100% (Production Resin) | Limited Simulants | |
| Surface Finish | High (Polished/Textured) | Low (Layer Lines) | |
| Fit & Function | Exact Validation | Visual Representation |
Choosing molding for development ensures that your test results are identical to what your customers will eventually receive.
How does prototype tooling reduce your manufacturing costs?
Prototype tooling reduces your costs by utilizing less expensive materials like aluminum and simplifying the mold construction process. By opting for a prototype mold , you avoid the massive capital expenditure associated with multi-cavity production tools. This financial flexibility allows you to allocate your budget toward further R&D or marketing efforts.
Can you save on design changes?
Think about it: changing a hardened steel mold is an expensive nightmare. Aluminum tools are much easier to modify or “steel safe” for minor design tweaks.
- Modification costs for aluminum are up to 60% lower than steel.
- You avoid the risk of scrapping a $50,000 production tool.
- Faster iterations mean lower overall engineering labor costs.
Key Takeaway: You protect your bottom line by using affordable tooling to finalize designs before moving into high-stakes mass production.
| Cost Element | Prototype Tooling | Production Tooling | |
|---|---|---|---|
| Initial Investment | 2,000−8,000 | 15,000−100,000+ | |
| Mod Cost | Low | High | |
| Risk Factor | Minimal | Significant |
The cost-efficiency of prototype tools makes them the preferred choice for startups and enterprises launching new hardware products.
What materials are best for a rapid prototype mold?
Aluminum alloys like QC-10 or 7075 are generally considered the best materials for rapid molds due to their excellent thermal conductivity and machinability. While your prototype mold might not last as long as steel, it can be machined much faster. This allows you to receive your first T1 samples in record time.
Why is thermal conductivity important?
Now: aluminum dissipates heat much faster than steel, which can actually help with cycle times during short runs. This leads to more consistent part quality during your validation phase.
- Rapid heat dissipation prevents part warping and sink marks.
- Faster cooling allows for shorter molding cycles during sampling.
- Lower machining forces mean tighter tolerances on complex geometries.
Key Takeaway: Selecting aluminum for your tooling provides the perfect balance of precision, speed, and cost for the vast majority of prototyping projects.
| Material Type | Pros | Cons | |
|---|---|---|---|
| 7075 Aluminum | Fastest machining, low cost | Limited tool life | |
| P20 Steel | Better durability, polishable | Slower to machine | |
| Nao-Steel | Extreme longevity | High cost, slow lead time |
Aluminum remains the industry standard for rapid tooling because it meets the dual needs of speed and precision.
How fast can you receive parts from prototype tooling?
You can typically receive your first molded parts in as little as 5 to 10 business days from the moment your design is approved. The speed of a prototype mold is driven by advanced CNC machining centers and a streamlined DFM process. This rapid turnaround is essential for staying ahead of competitors in fast-moving industries.
What happens during the first week?
Here is the deal: we don’t just cut metal; we optimize your design for the molding process immediately.
- Day 1-2: Detailed DFM analysis and mold design completion.
- Day 3-5: Precision CNC machining of core and cavity blocks.
- Day 6-8: Mold assembly and first-shot (T1) sample production.
Key Takeaway: A 10-day lead time allows you to maintain momentum in your development cycle and meet aggressive project deadlines.
| Stage | Estimated Duration | Output | |
|---|---|---|---|
| Design Review | 24 Hours | DFM Report | |
| Machining | 3-5 Days | Physical Tooling | |
| T1 Samples | 1-2 Days | First Parts |
Streamlined workflows ensure that you get high-quality parts in hand while the design is still fresh in your mind.
Can a prototype mold bridge the gap to mass production?
Yes, a prototype mold can often serve as “bridge tooling” to supply initial market demand while your high-volume production tool is being built. This strategy ensures you don’t have a gap in supply when your product officially launches. It is a smart way to generate revenue while waiting for permanent steel equipment to arrive.
Is bridge tooling right for you?
Bottom line? If you need thousands of parts immediately but your production tool takes 12 weeks, this is your solution.
- Fill early retail orders while scaling up your supply chain.
- Validate market demand with a pilot run of 2,000 to 5,000 parts.
- Maintain a presence in the market during production delays.
Key Takeaway: You can effectively manage supply chain risks by using your prototype tool to bridge the time gap to full-scale manufacturing.
| Production Volume | Strategy | Recommended Tooling | |
|---|---|---|---|
| 1 – 100 Parts | Prototyping | Aluminum / 3D Printing | |
| 100 – 5,000 Parts | Bridge Production | Aluminum / Soft Steel | |
| 10,000+ Parts | Mass Production | Hardened Steel |
Bridge tooling provides a strategic safety net that protects your brand during the critical launch phase of a product.
What design rules apply to prototype injection molding?
The design rules for a prototype mold are very similar to production molding, though some simplifications are allowed for speed. You must still account for draft angles, wall thickness, and gate placement to ensure a successful part. Following these guidelines ensures that your prototype is truly representative of the final product.
Which rules are most critical?
The best part? If you design correctly now, your transition to mass production will be seamless and error-free.
- Maintain uniform wall thickness to prevent sink marks and warping.
- Use a minimum of 1 to 2 degrees of draft for easy part ejection.
- Place gates in non-cosmetic areas to maintain aesthetic integrity.
Key Takeaway: Adhering to strict DFM principles during the prototyping stage guarantees that your design is ready for high-volume success.
| Design Element | Recommended Specification | Reason | |
|---|---|---|---|
| Draft Angle | 1° – 3° | Facilitates ejection | |
| Wall Thickness | 1.5mm – 3.5mm | Ensures uniform flow | |
| Rib Ratio | 40% – 60% of Wall | Prevents sink marks |
Correct design for manufacturability at the prototype stage eliminates the need for expensive redesigns during the production ramp-up.
How do you ensure quality in prototype mold construction?
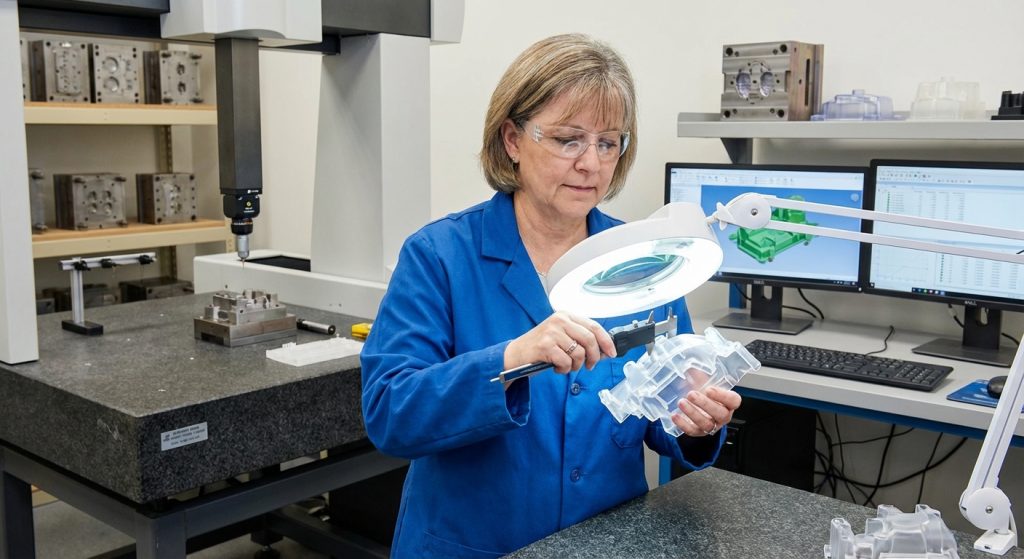
Quality is ensured through rigorous Coordinate Measuring Machine (CMM) inspections and detailed first-article reports for every sample run. Even for a short-lived tool, you need the same dimensional accuracy that you would expect from a permanent mold. Professional manufacturers use precision equipment to verify that your parts meet every tolerance on your print.
What should you look for in a report?
Essentially: you need data to prove the parts are right before you start your functional testing.
- Full dimensional reports covering all critical-to-quality (CTQ) dimensions.
- Material certifications ensuring the correct resin was used.
- Visual inspection for common defects like flash or short shots.
Key Takeaway: High-quality prototyping services provide the documentation you need to satisfy stakeholders and move forward with confidence.
| Quality Check | Method | Goal | |
|---|---|---|---|
| Dimensions | CMM / Calipers | Tolerance Adherence | |
| Visuals | Microscope / Eye | Surface Integrity | |
| Process | Press Monitoring | Cycle Consistency |
Rigorous inspection protocols ensure that the parts you test are an exact physical match to your digital CAD files.
Is an aluminum prototype mold better than a steel one?
It depends on your specific goals, but aluminum is usually superior for speed and cost, while steel is better for longevity and high-pressure resins. When you invest in a prototype mold , you must decide if you value a 7-day turnaround or a 10,000-shot tool life. For most development cycles, the speed of aluminum wins.
When should you pick steel?
Think about it: if your resin is highly abrasive, like glass-filled nylon, an aluminum tool might wear out too quickly.
- Choose P20 steel for abrasive or high-heat materials.
- Opt for steel when you need high-gloss or optical finishes.
- Use aluminum for 90% of standard consumer electronics parts.
Key Takeaway: You should consult with your manufacturing partner to choose the material that best supports your resin and quantity requirements.
| Factor | Aluminum Tooling | Soft Steel (P20) | |
|---|---|---|---|
| Lead Time | Faster | Moderate | |
| Cost | Lower | Moderate | |
| Resin Support | Standard Resins | All Resins |
While aluminum is the king of speed, soft steel offers a durable middle ground for more demanding prototyping applications.
How do you transition from prototype to full production?
The transition is handled by taking the lessons learned from your prototype run and applying them to the design of your high-volume steel mold. Your prototype mold serves as the ultimate test case, revealing any potential manufacturing issues before they become permanent. Once the design is frozen, you can move to multi-cavity tooling with 100% confidence.
What data should you carry over?
Here is the deal: your manufacturing partner will use the gate locations and cooling data from the prototype to optimize the production tool.
- Finalize gate locations based on actual resin flow patterns.
- Confirm shrinkage rates for high-precision dimensional control.
- Optimize cycle times to ensure the lowest possible part price.
Key Takeaway: Using a prototype stage as a stepping stone ensures your high-volume production is efficient, stable, and cost-effective.
| Step | Action | Outcome | |
|---|---|---|---|
| Validation | Finish Prototype Testing | Design Freeze | |
| Optimization | Apply DFM Lessons | Production Tool Design | |
| Scaling | Build Steel Tooling | Mass Manufacturing |
A successful transition is built on the data-driven insights gained during the rapid prototyping phase of your project.
Summary of Prototype Tooling Benefits
Choosing the right path for your product development determines how quickly and safely you can reach the market. Prototype tooling solves the fundamental problems of high entry costs and design uncertainty by providing production-quality parts in days. You gain the ability to iterate rapidly, test with real materials, and bridge the gap to high-volume manufacturing without breaking the bank. At CN Precision, we specialize in moving your projects from concept to reality with precision and speed.
We are committed to being your long-term manufacturing partner, offering the technical guidance and IATF 16949-certified quality you need to succeed. Whether you are launching a medical device or a new automotive component, our team ensures your tooling is optimized for success. Ready to take the next step? You can contact us today to receive a free DFM analysis and start your journey toward manufacturing excellence.
Frequently Asked Questions
Can I use production resins in a prototype mold?
Yes, the primary advantage of this process is the ability to use actual production-grade resins rather than 3D printing simulants. This ensures your functional testing is 100% accurate to the final product’s performance.
What is the typical life of an aluminum prototype tool?
It depends, but most aluminum tools are guaranteed for at least 2,000 to 5,000 shots depending on the complexity and resin used. For many projects, this is more than enough to cover prototyping and initial market testing.
How much does a prototype mold usually cost?
It varies, but most simple prototype tools range between
2,000and
8,000 depending on part size and geometry. This is significantly cheaper than the $20,000+ price tag of permanent steel production molds.
Is it possible to modify a prototype tool after it is built?
Yes, aluminum is much easier to modify than hardened steel, allowing for “steel safe” changes if you need to adjust dimensions. This flexibility is one of the main reasons engineers choose prototype tooling for iterative designs.
What is the fastest lead time for prototype parts?
It depends on complexity, but standard parts can often be delivered in as fast as 5 to 7 business days. This includes the time needed for mold design, machining, and initial sample production.