Injection molding surface finishes are the specific textures or polishes applied to a mold cavity to dictate the final appearance and tactile feel of a plastic part. Imagine finalizing a high-stakes product launch only to realize the surface looks dull or displays unsightly tool marks. This cosmetic failure can alienate your customers and damage brand perception. By selecting the optimal mold surface finish , you ensure your components meet professional standards while maintaining structural integrity.
Why is selecting the right mold surface finish critical?
Selecting the correct finish defines the user experience, part functionality, and the overall professional quality of your product. The mold surface finish you select acts as the primary interface between your engineering design and the end-user’s physical touch.
Getting the finish right the first time prevents costly mold modifications and production delays. This choice directly impacts how light reflects off your part and how it feels in a user’s hand.
Balancing Aesthetics with Function
When you design a part, you must decide if the surface needs to be purely cosmetic or if it serves a mechanical purpose. Glossy finishes are excellent for consumer electronics, while matte textures help hide fingerprints and minor scratches.
Here is the kicker: the wrong finish can actually make a part harder to manufacture. Consider these functional benefits:
- Improved paint and decal adhesion.
- Enhanced grip for handheld industrial tools.
- Masking of weld lines and sink marks.
- Reduced light glare on control panels.
The Impact on Mold Longevity
High-quality tool steel combined with a precise finish can extend the life of your mold significantly. Smoother surfaces often allow for easier part release, reducing the stress on ejector pins during every cycle.
Key Takeaway: Choosing a finish early in the design phase allows you to optimize your budget and ensure the part performs as expected in its final environment.
| Benefit Category | Impact on Part | Production Value | |
|---|---|---|---|
| Cosmetic | High visual appeal | Increases market value | |
| Mechanical | Better grip/adhesion | Enhances part utility | |
| Manufacturing | Easier part release | Lowers cycle time |
This table illustrates how surface selection influences both the end-user’s perception and the efficiency of the manufacturing floor.
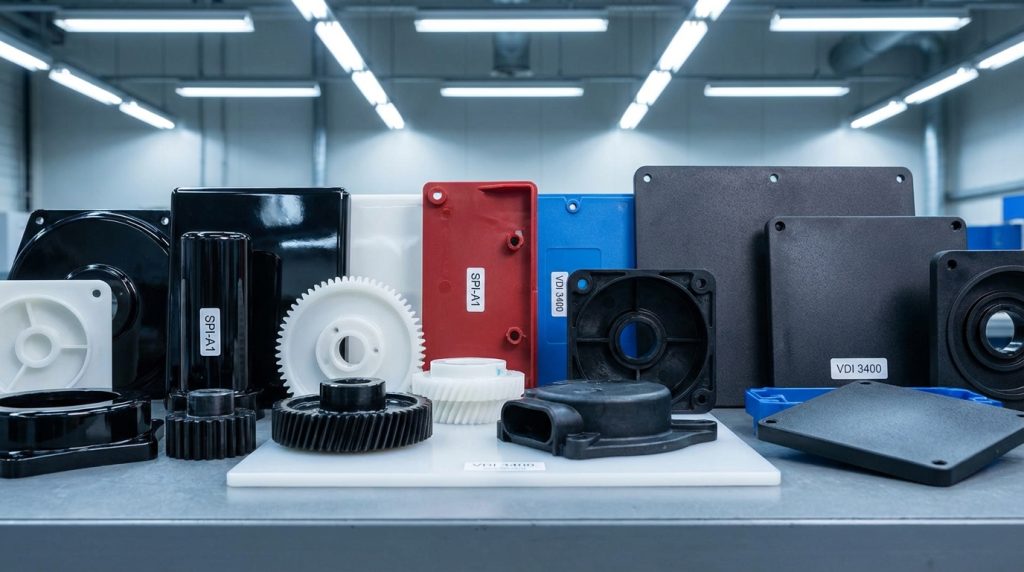
How do standard SPI classifications define your part quality?
SPI classifications provide a globally recognized language for engineers to communicate the exact level of polish or texture required for a project. Identifying the appropriate mold surface finish within these categories allows you to manage lead times and manufacturing costs effectively.
The standard ranges from Grade A diamond polishes to Grade D sandblasted textures. Each level requires a different tooling approach and significantly affects the final unit cost.
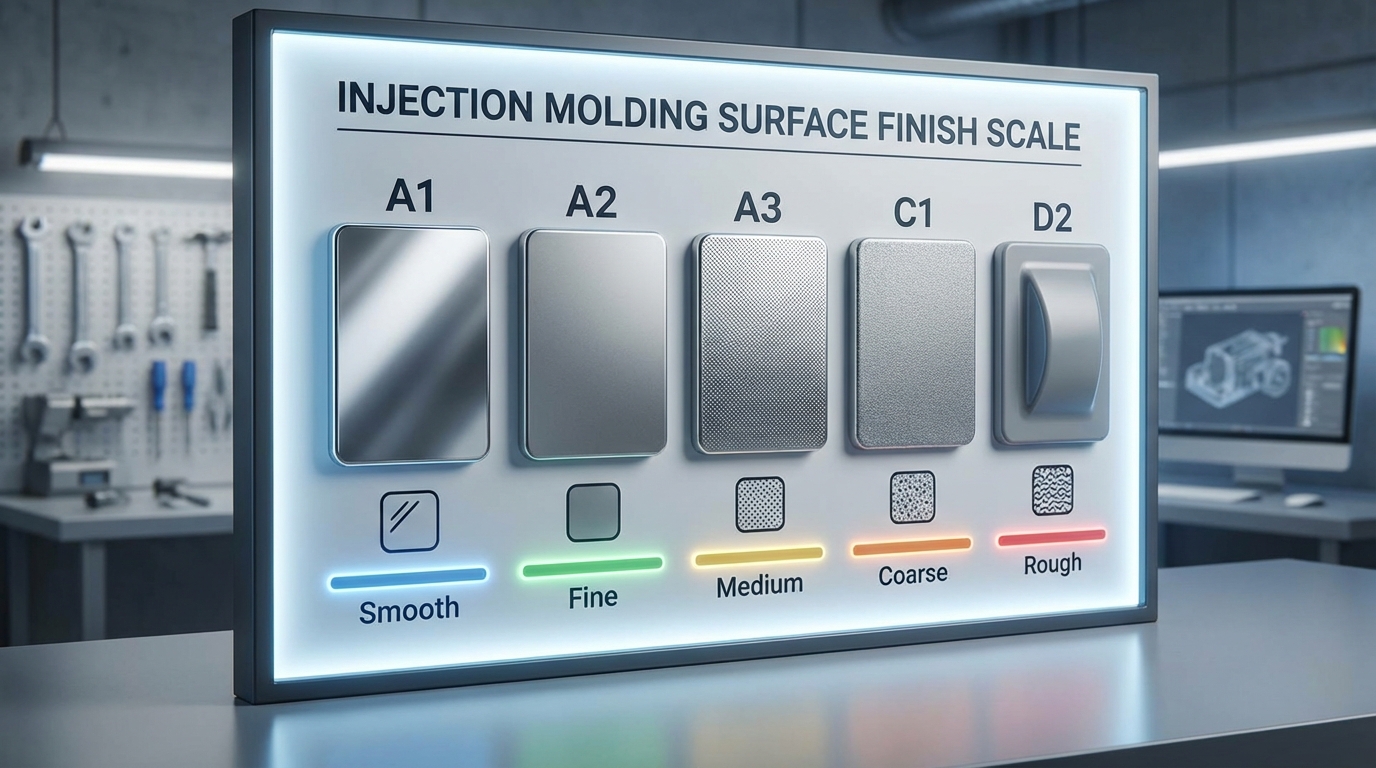
Decoding the SPI Grading System
The grading system is divided into four main categories, each utilizing a different method of mold preparation. Grade A finishes use diamond powder for a mirror-like shine, whereas Grade B uses grit paper for a semi-gloss look.
But wait, there’s more to consider when looking at the specifics:
- Grade A: High-gloss, mirror finish for optical clarity.
- Grade B: Semi-gloss finish that removes most tool marks.
- Grade C: Matte finish created with stone polishing.
- Grade D: Textured finish produced by bead blasting.
Cost and Lead Time Implications
Finer polishes like A-1 require extensive manual labor and specialized equipment to achieve. If your part is an internal component, spending extra on a diamond buff is often an unnecessary expense.
Key Takeaway: Using standardized SPI grades ensures that your manufacturer understands your requirements perfectly, preventing errors and ensuring consistency across batches.
| SPI Grade | Preparation Method | Final Appearance | |
|---|---|---|---|
| A-1 | #3 Diamond Buff | High-Gloss Mirror | |
| B-2 | 400 Grit Paper | Semi-Gloss | |
| C-3 | 320 Stone | Dull Matte | |
| D-1 | Dry Glass Bead | Rough Texture |
Understanding these categories helps you select a finish that provides the best return on investment for your specific application.
Which factors influence the final look of your mold surface finish?
The final appearance of your part depends on more than just the mold; the resin and additives you choose are equally influential. Your mold surface finish will look vastly different on a clear polycarbonate than it will on a black, glass-filled nylon.
Darker colors tend to highlight textures and imperfections more than lighter shades. Additionally, the hardness of the plastic dictates how accurately the resin picks up the fine details of the mold’s texture.
The Role of Resin Selection
Amorphous resins like ABS and PC capture high-gloss finishes with incredible clarity and detail. In contrast, semi-crystalline resins may have a slightly more matte appearance even when used in a polished mold.
Make no mistake: material choice is the silent partner of surface finishing.
- Harder materials: Excellent for picking up crisp, sharp textures.
- Softer materials: Better for tactile, rubber-like matte finishes.
- Filled resins: Glass or mineral fillers can cause “streaking” on polished surfaces.
- Clear materials: Require the highest polish (SPI A-1) for maximum transparency.
How Additives Change the Game
Adding flame retardants or UV stabilizers can sometimes alter the flow of the plastic, affecting how it settles against the mold wall. These chemicals can occasionally create a slight haze on what should be a mirror-finish part.
Key Takeaway: Always consult with your engineer to ensure your chosen resin is compatible with the surface finish required for your product’s success.
| Variable | Influence Level | Effect on Finish | |
|---|---|---|---|
| Material Color | High | Darker colors show more detail | |
| Glass Fill | Medium | Can cause surface “silvering” | |
| Resin Type | High | Dictates gloss vs. matte capability |
This analysis confirms that a holistic approach to material and mold design is necessary to achieve the desired cosmetic result.
Can textured finishes improve your product’s functional grip?
Textured finishes are a strategic choice for products that require a non-slip surface or need to withstand rugged handling. A well-placed mold surface finish can transform a slippery plastic housing into a secure, ergonomic tool that inspires user confidence.
Beyond grip, textures are highly effective at hiding common molding defects like sink marks or minor scratches. This makes them the preferred choice for industrial equipment and automotive interiors.
Benefits of Bead Blasting and Etching
Bead blasting creates a uniform, non-directional texture that is excellent for diffusing light and reducing glare. For more complex patterns, chemical etching can create leather-like or geometric designs on the mold surface.
The bottom line is this:
- Textured Grip: Essential for handheld medical and industrial devices.
- Defect Masking: Hides flow lines and cooling imperfections.
- Light Diffusion: Prevents harsh reflections on electronic displays.
- Tactile Quality: Gives a premium, “soft-touch” feel to hard plastics.
Improving Paint and Coating Adhesion
A textured surface increases the total surface area of the part, allowing paints and secondary coatings to bond more effectively. If your project requires post-processing, a matte texture is often superior to a high-gloss finish.
Key Takeaway: Textures provide a dual benefit of enhancing both the ergonomic feel of the product and its durability against daily wear and tear.
| Texture Type | Application | Key Benefit | |
|---|---|---|---|
| Light Bead Blast | Electronics | Anti-glare and matte look | |
| Medium Blast | Tools | Improved tactile friction | |
| Chemical Etch | Automotive | Premium aesthetic patterns |
Choosing a textured finish is often the smartest move for products that must endure heavy usage while maintaining a professional look.
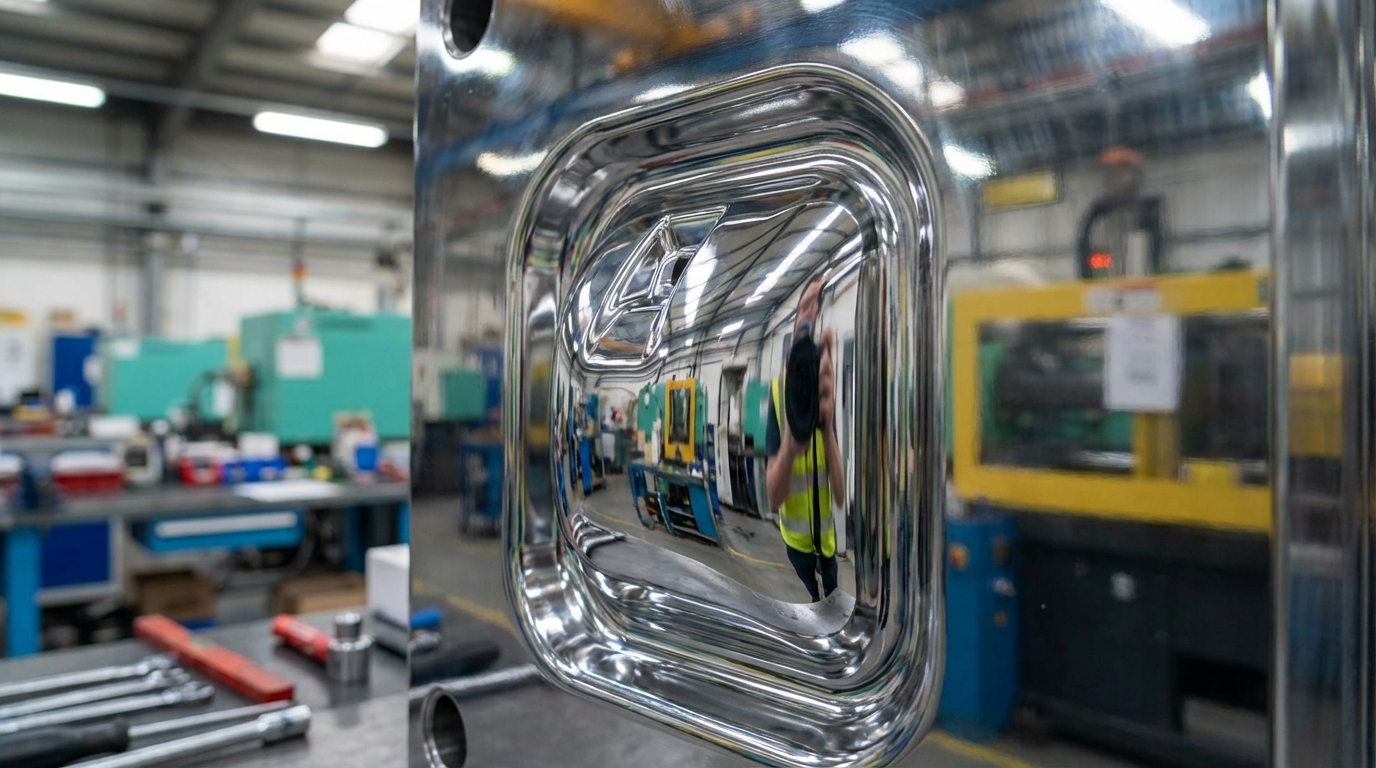
What are the best practices for achieving a high-gloss mold surface finish?
Achieving a flawless, high-gloss finish requires high-quality mold steel and a meticulous multi-stage polishing process. Selecting an A-grade mold surface finish ensures that your transparent or cosmetic parts have the “wow factor” required for premium markets.
Any small scratch or imperfection on the mold will be magnified once the plastic is injected. This is why we use precision diamond-buffing techniques to reach a mirror-like state.
Ensuring Optical Clarity in Lenses
For lenses and light pipes, the A-1 finish is the industry gold standard for minimizing light scattering. The mold must be free of all tool marks and pitting to allow the resin to form a perfectly smooth surface.
Believe it or not, the mold material itself is critical:
- Stainless Steel: Resistant to corrosion, maintaining polish longer.
- Hardened Steel: Best for high-volume runs requiring consistent gloss.
- Aluminum: Good for prototyping, though harder to maintain at A-1 levels.
- Cleanliness: Even microscopic dust during polishing can ruin the finish.
Avoiding Common “Cloudy” Defects
If the mold is not vented properly, trapped gases can create a cloudy or “hazed” appearance on a high-gloss part. Ensuring proper gate placement and venting is just as important as the polishing process itself.
Key Takeaway: High-gloss finishes are high-maintenance; they require superior tooling and careful process control to remain consistent throughout a production run.
| Polish Step | Tooling Used | Final Result | |
|---|---|---|---|
| Step 1 | Fine Stones | Removes all milling marks | |
| Step 2 | Grit Paper | Smooths out stone lines | |
| Step 3 | Diamond Paste | Achieves mirror-like shine |
A high-gloss finish is the ultimate indicator of manufacturing precision and brand quality for clear or decorative components.
How does draft angle impact your choice of surface texture?
Draft angle is a non-negotiable design element that allows your part to be removed from the mold without damage. When you select a deep mold surface finish, you must increase the draft angle to prevent the texture from “grabbing” the mold wall.
If the draft is too shallow, the part will develop drag marks or scuffs during the ejection phase. This essentially ruins the cosmetic benefit you were trying to achieve with the texture.
Determining the Required Degrees
A standard smooth finish usually requires a minimum of 0.5 to 1 degree of draft. However, for heavy bead-blasted or etched textures, you may need to design for 3 to 5 degrees of draft per side.
Here is the kicker:
- Light Textures: Generally need 1.5 to 3 degrees.
- Heavy Textures: Require 5 degrees or more for safe release.
- Deep Ribs: Hard to reach with texture and require even more draft.
- A-Side vs B-Side: Draft needs may vary depending on which side holds the part.
Avoiding Scuffs and Drag Marks
When a part is ejected, it moves away from the mold surface. Without a proper draft, the tiny peaks and valleys of a textured mold will scrape against the part, creating permanent white streaks.
Key Takeaway: Always integrate your surface finish choice into your CAD model early to ensure you have enough space for the necessary draft angles.
| Finish Type | Typical Draft | Potential Risk | |
|---|---|---|---|
| Polished (SPI-A) | 0.5° – 1° | Vacuum seal/Sticking | |
| Matte (SPI-C) | 1° – 2° | Scuffing | |
| Textured (PM-T2) | 3° – 5° | Drag marks/Scrap |
Designing with the correct draft is the only way to guarantee that your chosen texture looks as intended after the part leaves the machine.
Are there specific finishes for medical and automotive parts?
Medical and automotive industries have strict requirements for surface finishes to ensure safety, hygiene, and durability. Your mold surface finish choice must align with IATF 16949 standards for automotive parts or cleanroom requirements for medical devices.
In these sectors, finishes are often chosen to reduce glare for drivers or to prevent bacterial growth on medical equipment. These are not just aesthetic choices—they are functional imperatives.
Safety-Critical Automotive Finishes
Automotive interiors often utilize low-gloss matte finishes to prevent sun glare from blinding the driver. These textures also need to be scratch-resistant to maintain the vehicle’s “new” look over years of use.
But wait, there’s more to these industry standards:
- Non-Reflective: SPI-C1 or D-1 for dashboards and consoles.
- Chemical Resistance: Textures that don’t trap cleaning agents.
- Consistency: Identical finishes across different suppliers and materials.
- Durability: High-resistance textures for high-touch areas like door handles.
Hygienic Medical Grade Surfaces
For medical devices, a smooth, high-polish finish is often preferred because it is easier to sterilize. Any deep texture could potentially harbor contaminants or make it difficult to wipe the device clean in a clinical setting.
Key Takeaway: Industry-specific finishes provide the necessary compliance and safety features that protect both the end-user and your company’s liability.
| Industry | Preferred Finish | Primary Reason | |
|---|---|---|---|
| Automotive | Matte/Textured | Reduce glare/Scratch resistance | |
| Medical | High Polish | Sterilization/Cleanliness | |
| Electronics | Semi-Gloss | Fingerprint resistance |
By adhering to these industry-specific norms, you ensure your product is fit for purpose and compliant with international regulations.
When should you opt for a non-cosmetic as-milled finish?
An as-milled finish is the most cost-effective option for internal components where the appearance of the mold surface finish does not matter. These parts are often structural, such as internal ribs, brackets, or housings that will be hidden inside a larger assembly.
Choosing an as-milled finish (PM-F0) allows the manufacturer to bypass secondary polishing steps. This significantly reduces the total tooling cost and speeds up your time-to-market.
Saving Costs on Internal Components
For many B2B projects, every dollar saved on tooling translates to a more competitive unit price. If the end-user will never see the part, there is zero benefit to paying for an SPI-A1 diamond polish.
The reality of the situation is:
- Lower Tooling Cost: No manual polishing labor required.
- Faster Delivery: Molds can be put into production immediately after machining.
- Structural Focus: Focus budget on tolerances rather than shine.
- Acceptable Marks: Milling lines are visible but do not affect strength.
Identifying Where Appearance Matters
It is vital to distinguish between “hidden” and “semi-visible” parts. If a consumer can see the component through a vent or a gap, a basic SPI-C1 stone finish might be a safer middle ground.
Key Takeaway: As-milled finishes are a strategic budget tool that allows you to allocate resources to the areas of your project that provide the most value.
| Component Type | Recommended Finish | Cost Impact | |
|---|---|---|---|
| Internal Brackets | As-Milled (F0) | Lowest Cost | |
| Engine Components | Non-Cosmetic (F2) | Minimal Cost | |
| Battery Housing | Matte (C1) | Moderate Cost |
Strategic use of non-cosmetic finishes is a hallmark of efficient engineering and savvy project management.
Why is DFM analysis vital for your mold surface finish choice?
Design for Manufacturability (DFM) analysis is the process of reviewing your part design to ensure the chosen mold surface finish is feasible. This review happens before the first piece of steel is cut, saving you from expensive mistakes.
A thorough DFM report will highlight if your texture is too deep for your draft angles or if a polish will cause sticking. It is the insurance policy every engineering manager needs.

Catching Potential Flaws Early
During DFM, we look for areas where the texture might be difficult to apply, such as deep, narrow slots or thin ribs. We also evaluate how the gate location will affect the finish, as high-gloss areas can show “gate blush” or flow marks.
Don’t ignore these DFM warnings:
- Inadequate draft for the requested texture.
- Ribs that are too deep for polishing tools to reach.
- Material selection that won’t hold the desired gloss level.
- Wall thickness variations that could cause sink on a polished surface.
Optimizing Gate and Ejector Placement
For highly cosmetic parts, you want to hide the gate and ejector pin marks on the non-visible side. DFM helps you decide which side of the mold (A or B) should receive the premium finish.
Key Takeaway: DFM analysis bridges the gap between a digital design and a physical part, ensuring your surface finish is both beautiful and manufacturable.
| DFM Checkpoint | Surface Finish Impact | Solution | |
|---|---|---|---|
| Draft Angle | Texture scuffing | Increase draft by 1-2° | |
| Gate Location | Visible flow marks | Move gate to hidden area | |
| Wall Thickness | Sink marks | Maintain uniform thickness |
An expert DFM review ensures that the final part matches your vision without compromising on production quality or speed.
How can a custom finish differentiate your B2B product line?
Custom finishes allow you to go beyond the standard SPI list to create a unique look and feel for your brand. A signature mold surface finish can make your product instantly recognizable in a crowded B2B marketplace.
Whether it is a dual-textured surface or a specific etched pattern, custom finishes offer a competitive edge that is difficult for others to replicate. It shows a commitment to detail and premium engineering.
Combining Polished and Textured Areas
You can request different finishes for the A-side (visible) and B-side (internal) of your mold. This allows you to have a high-gloss external housing with a cost-effective matte internal structure.
Here is the kicker:
- Dual Finishes: Polish the logo area while texturing the rest.
- Unique Patterns: Create brand-specific textures through chemical etching.
- Color Interaction: Custom textures can change how colors appear under light.
- Premium Feel: High-end textures can make standard plastics feel like luxury materials.
Enhancing Brand Identity
Consistent surface finishing across your entire product line builds brand trust. When every part feels the same—whether it’s a handle, a button, or a housing—it reinforces the perception of a high-quality, integrated system.
Key Takeaway: Custom surface finishes are a powerful marketing tool that communicates quality and innovation through the simple medium of touch.
| Customization | Strategy | Brand Impact | |
|---|---|---|---|
| Logo Polishing | Contrast A-1 logo on D-1 body | Highlights brand name | |
| Geometric Etch | Modern tech look | Communicates innovation | |
| Soft-Touch Pattern | Improved ergonomics | Enhances user comfort |
This strategic approach to finishing ensures that your product doesn’t just work well—it leaves a lasting impression on everyone who uses it.
Injection molding is a complex journey from a CAD file to a finished product. At CN Precision, we specialize in helping you navigate these technical choices to achieve the perfect result. Whether you need automotive-grade precision or a unique consumer finish, our team is ready to provide the IATF 16949-certified quality your project deserves. We are committed to solving your manufacturing frustrations through transparent communication and expert engineering support.
If you are ready to elevate your part quality and optimize your production costs, contact us today to start your worry-free project. We transform your complex designs into high-precision reality, ensuring your brand stands out in the global market.
FAQ
Can I use different surface finishes on the same part?Yes, you certainly can. By masking off specific areas of the mold, we can apply a high-gloss polish to one section and a matte texture to another, which is perfect for highlighting logos or creating functional grip zones.
What’s the best finish for hiding manufacturing defects?A textured finish, such as a medium bead blast (PM-T2), is the most effective choice. These textures diffuse light in multiple directions, which naturally masks minor flow lines, sink marks, and other common cosmetic inconsistencies.
How do I know if my draft angle is sufficient for a texture?You should conduct a DFM (Design for Manufacturability) analysis with your supplier. As a general rule, you need at least 1.5 degrees of draft for light textures and up to 5 degrees for deep, aggressive bead blasting or etching.
Can clear parts achieve a mirror-like finish?Yes, provided you select an SPI A-1 or A-2 finish. These mirror finishes are achieved through meticulous diamond buffing of the mold steel, ensuring that clear resins like polycarbonate maintain maximum optical clarity without haze.
What is the fastest surface finish to produce?The as-milled (PM-F0) finish is the fastest because it requires no secondary manual polishing. This is the ideal choice for internal or structural components where the aesthetic appearance is not a factor in the part’s performance.